

Summary
– Focus on flexible tanks
– Step 1: Choose the location of the tank.
– Step 2: Prepare the ground.
– Step 3: Put the flexible tank in place.
– Step 4: Connect the flexible tank.
Wanting to collect rainwater to water your garden or clean your car is an ecological gesture that may encourage you to purchase a flexible cistern. Its implementation is simple because it does not require any earthwork, just a careful preparation of the ground.
Here are the steps explained step by step to install a flexible tank.
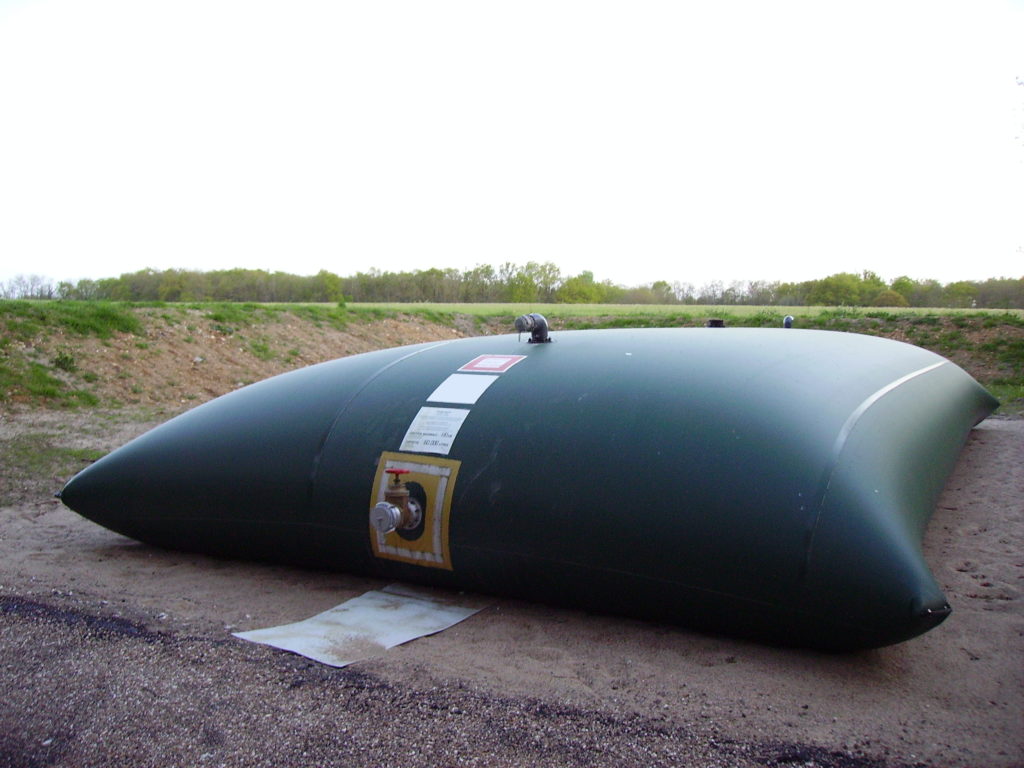
Zoom on the flexible tanks.
Remember that the flexible cistern design, with no air/water contact, avoids algae and bacteria’s proliferation. A flexible tank also has the advantage of requiring no maintenance.
The capacity of flexible tanks varies considerably, from 1 to more than 400 m3. When they are of a substantial capacity and depending on the desired installation, they may require motorized machinery to level the ground. Calling on professionals will make your task easier and will guarantee quality work and adapted equipment.
A flexible tank is closed, therefore opaque, treated anti-UV, and self-supporting, it is equipped:
– with an overflow valve;
– of a filling with valve ¼ of the tower;
– with an outlet with a ¼ tower valve;
And sometimes it is empty in the lower part.
A flexible cistern installed outdoors and in a crawl space or under a terrace is connected to one or more downspouts. The water is distributed either by gravity or by a pump.
The cistern is generally sold with a connection kit, the characteristics of which vary according to the manufacturer, including:
– one or more collectors that must be filtering (to retain leaves and debris and avoid silt) and to be adapted to the gutter downspout;
– a flexible hose to connect the collector to the tank;
– the flexible hose to connect the tank to the pump;
– Adapted and compatible fittings and joints;
– a pump with its suction kit.
Caution: note that the use of rainwater for sanitary and washing machine use requires installing a specific filtration system.
1. Choose the location of the cistern.
– Read the manual carefully before starting the installation.
– Note the footprint of the tank and provide a clearance zone around it.
– Determine the location of your cistern according to your land constraints, but also to the use you wish to make of the recovered water, proximity to the house, garden, gutter downspout…
– Choose a flat, horizontal and level surface.
2. Prepare the ground.
– Roughly delimit the land where you will install your tank.
– Remove any pebbles that are flush with the surface and anything that might puncture the liner.
– Place a sand mat about 10 cm thick.
– Spread it as evenly as possible with a rake.
3. Put the flexible tank in place.
The tank is delivered rolled up.
– Unroll the canvas according to the instructions.
– Wear clean, smooth-soled shoes; you can walk on the tank without risk of damage.
– If you have to move it, it is better to be four, one person in each corner:
◦ Shake each corner of the cistern to let air in under the tarp.
◦ Then lift it in one go.
◦ Move it around and lay it flat in its final position.
4. Connect the bladder
Carefully follow the installation instructions, which show step by step the connection of each of the elements.
– Install the filter collector on the gutter downpipe according to the instructions.
– Connect the flexible hose to it.
– Connect this hose to the ¼ tower valve: the filling is provided from the top, from the side, or even from the bottom, depending on the model.
– Connect the second hose to the outlet valve ¼.
– Connect it to the pump at the other end.
– Screw on the safety overflow.
Hope the above helps you out. Remember to share and comment on this post.
Read more here: 5 Steps to Install a Rainwater Harvester.


Pingback:Why Choose a Flexible Water Tank to Collect Rainwater? - Pipesandwrenches
Pingback:How to Use a Universal Multimeter or Tester - Pipesandwrenches
Pingback:Read This Before Choosing Your Shower Mixer! - Pipesandwrenches
Pingback:Safety Standards to Follow in Bathroom Installation - Pipesandwrenches
Pingback:How to Maintain a Water Softener - Pipesandwrenches
Pingback:Watts and Lumens: What Is the Difference? - Plumbers services
Pingback:What Is an Energy-Saving Bulb? - Pipesandwrenches
Pingback:What Is a Wall Valve? - Plumbers services