

Contents
– Toilet evacuation: two types of connections
– Toilet evacuation: connection to the water supply
– Toilet evacuation: connection to the wastewater
Installing a toilet implies taking care of the evacuation of the toilet.
Installing a conventional toilet involves:
– fixing the bowl, whether it is free-standing, suspended, or floor-standing,
– fixing the cistern whether it is wall-mounted, integrated with the wall, or adjacent to the bowl,
– the connection of the toilet to the wastewater drain.
For the installation of a macerator toilet, the technique will be different.
Good to know: If you want to contact sanitary fitters near you to get a quote quickly and without any cost, the directory listing is an excellent way to start.
Toilet evacuation: two types of connections
For the installation of a toilet, it is necessary to make two types of connections:
– to the water supply,
– to the wastewater network.
Here is how to proceed:
Toilet evacuation: the connections to be made
Connection to the water inlet to supply the tank with water:
– with a copper or plastic pipe,
– diameter of 10 (inside) x 12 (outside) mm.
Connection to the drain to discharge the wastewater:

– PVC pipe with a minimum diameter of 100 mm or 80 mm (if the length is less than 1 m) and a minimum slope of 1 cm/m.
– For a vertical evacuation: model with hidden back central CA outlet or S (under the WC),
– for horizontal evacuation: model with H outlet, also called P (at the back of the WC).
WC evacuation: connection to the water supply
Installing a stopcock to your water pipe simplifies:
– installation,
– maintenance or repair of your flushing mechanism.
The easiest and quickest solution is to use a flexible connection from the stopcock to the tank.
The length of the hose that carries the water from the tank to the bowl varies:
– non-existent: in the case of a tank attached to the bowl or a one-piece toilet,
– short: in the case of a low wall-mounted flush (about 200 cm from the floor) or a flush built into the wall,
– long: in the case of a high wall-mounted flush (about 85 cm from the floor).
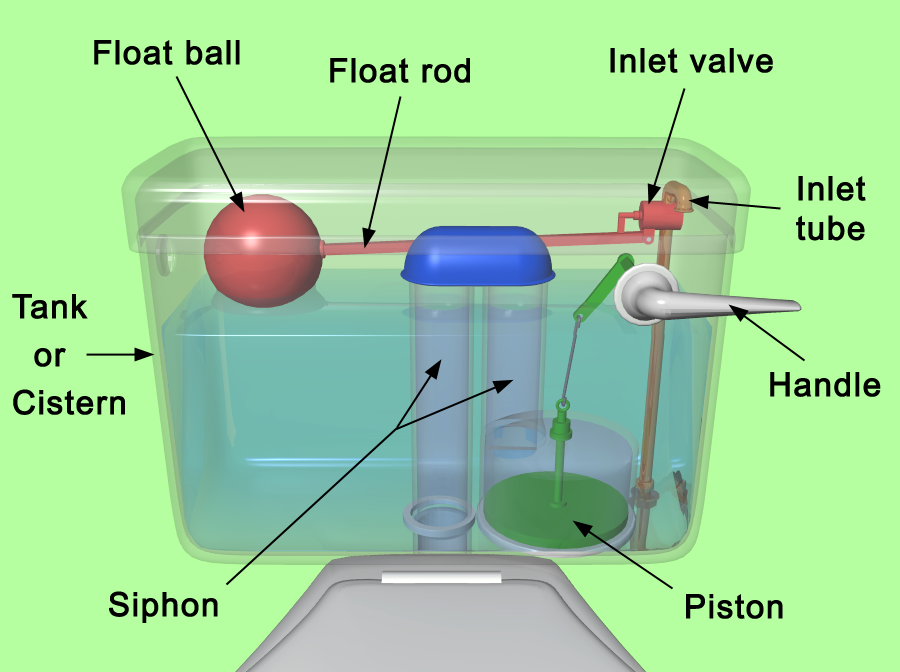
In the case of a gravity flush, mount the float valve inside the cistern and connect the inlet to the valve.
Important: Be sure to read the operating instructions accompanying the equipment and make the adjustments as advertised, especially the float stem. Check that there is no leakage by filling the tank.
Toilet evacuation: connecting to the wastewater
The connection with the drainpipe, standard diameter 100 mm, is made through a plastic connecting element, a sleeve called a pipe.
A sleeve for the connection
This sleeve acts as an adapter between the diameter of the bowl outlet and that of the drain:
– it has an elastomer lip seal for the connection to the bowl and a smooth part on the discharge side,
– it exists in several lengths and shapes: elbowed, straight, off-center..,
– it can be flexible, extendable, and adjustable to adapt easily to the right height.
Good to know: Directly sealing the bowl outlet to the drainpipe with mastic or cement glue is not recommended. A perfect seal is more difficult to achieve, and dismantling is much more dangerous!
Assembly of the WC drainage pipe
The following steps are essential to assemble the sleeve (pipe):
– Remove the remains of the old sleeve,
– clear the drainpipe of any debris, dirt, or leftover sealant,
– Seal the pipe with a rag or a paper ball until the connection is made,
– during the connection, place the new sleeve, which must ensure a perfect seal, its narrowest part on the nozzle side and its widest part on the outlet side of the bowl,
– glue it with a special PVC glue.
That’s it. We are now done with WC: evacuation and connection. How did you find this post? Remember to share and comment!


