8 Steps for Installing a Bathtub
Summary
– Step 1: Prepare your workspace
– Step 2: Install the bathtub legs
– Step 3: Install the faucets
– Step 4: Attach the brackets to the wall
– Step 5: Place the bathtub on the brackets
– Step 6: Connect the tub to the drain
– Step 7: Install the apron
– Step 8: Finalize the installation
While designing a bathroom layout and doing it yourself requires a certain amount of expertise, installing a bathtub is within reach of any do-it-yourselfer. Follow our guide to learn the steps.
1. Prepare your workspace
This post uses the example of a plastic bathtub with an apron (and mounting kit), in a configuration where it is placed against two adjoining walls. The water inlet and drain must be planned in the case of a first installation.
– Prepare the walls: they must be clean. Tiling or painting should be finished as this will be more difficult after the bathtub is installed.
– Turn off the water: if necessary, turn off the valves or the water supply tap to avoid flooding.
– Clear the work area: make sure that fragile objects, such as mirrors and items on benches, are moved. Remove bath mats and make sure you have maximum space.
2. Place the feet of the bathtub
– Install blankets, cardboard, or sheets to protect your floor.
– Turn the bathtub over, place it on the pads and screw the feet in place.
– Put the bathtub back on its feet.
– Check for levelness by placing a spirit level on the edges of the tub, first width-wise and then lengthwise. The bubble should be in the middle of the level.
Tip: If you don’t have a long enough spirit level, place a mason’s rule on the rim and put the spirit level on top.
– If necessary, adjust the feet with a wrench.
– Also, check the level on the diagonals.
Important: the adjustment of the legs must take into account the installation of the deck, and therefore its height. Measure and check or, even better, make a blank pause (without fixing it). It must be positioned without forcing and rest on the floor.
3. Install the faucet
There are 2 possible configurations for the faucet:
– It is already in place, installed on the wall: install the drain and the overflow on your bathtub.
– If you do not have a faucet yet: install the mixer on your bathtub, opposite the water inlet, without forgetting the drain and overflow.
4) Attach the brackets to the wall
– Position the bathtub in its final location.
– Draw a pencil line on the walls following the top and bottom edges of the tub.
– For the pencil line under the bottom edge of the tub, start the line before pushing the tub in and finish it using the spirit level and a ruler.
– Cut two cleats, the same size as the width and length of the tub. Remember to shorten one of the two cleats by one edge thickness.
– Drill and countersink the cleats a few inches from their ends and divide two additional holes on the large cleat and one on the small one.
– Remove the tub.
– Place the first strip underneath and along the bottom line. Check with a spirit level to make sure it is level.
– Locate the fixing holes and drill the wall with a drill bit adapted to the nature of your wall.
– Dust off and fix the strip with hammer dowels.
– Place the second strip and check that it is perfectly aligned with the first.
5. Place the bathtub on the brackets
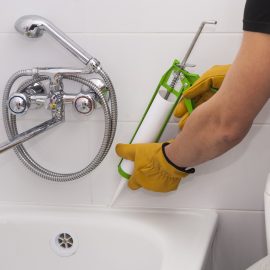
– Apply a silicone sealant to the top of the brackets.
– Place the bathtub on the brackets and adjust it perfectly to the walls.
– If you have installed a faucet on the bathtub, screw the faucet hoses to the water supply.
6. Connect the bathtub to the drain
– Assemble your drain hose according to the instructions, which may differ depending on your chosen model.
– Sand the inside of the drainpipe, the one that comes out of the wall or the floor, and the outside of the hose that fits into it.
– Glue the pipe, the inside and the outside of the hose, then insert the hose into the hole.
– Connect the hose to the trap and check for leaks by pouring water down the drain.
Good to know: there are traps that you can connect to the drain by screwing.
7. Install the apron
Place the apron support feet at each end of the bathtub, on the free edge, facing you but not entirely on the sides (follow the apron installation instructions).
– Once the feet are in place, mark the location of the fasteners on the floor.
– Remove the legs.
– Drill and peg your floor, knowing, of course, that the drill bit and pegs must be adapted to the nature of the floor.
– Replace the feet and adjust them to lie flat on the floor and adequately hold the tub rim.
– Screw the legs into the floor.
– Place your apron on the tub and mark its vertical location on the wall with a pencil.
– Remove the apron and place a support bar, checking that it is vertical with a spirit level.
– Drill the cleat and fasten it with hammer dowels.
– Install the curtain, secure it with screws in the appropriate places, and finish by installing screw covers.
8. Finalize the installation
Apply a white silicone sealant all around the bathtub in contact with the wall to complete the waterproofing.
– Dip your index finger in a mixture of water and dishwashing liquid and smooth the seal.
– Wipe off any excess with a clean, lint-free damp cloth.
– Turn on the water supply and test by turning on the mixer and operating the drain to ensure there are no leaks and that everything is working correctly.
Now you can enjoy a nice relaxing bath!
Materials needed to install a bathtub.
| Cartridge of mastic |
| Hammer dowel |
| Cloth |
| Adjustable wrench |
| Flat wrench |
| PVC glue |
| Mason’s pencil |
| Dishwashing liquid |
| Hammer |
| Tape measure |
| Spirit level |
| Sandpaper |
| Percussion drill |
| Putty gun |
| Container |
| Mason’s ruler |
| Wood saw |
| Drawer |
| Phillips screwdriver |
| Screwdriver |
Read more:
– Why Install a Spa Bathtub in Your Bathroom;
– Why Choose a Corner Whirlpool Bathtub;
– Maintenance of a Whirlpool Bathtub.

